Requests - How to manage a Destructive Sampling request
Please be aware that this guidance is currently being updated and some sections may have the old numbering still in place.
Table of contents
This workflow will take you through recording a basic destructive sampling request where the sampling will be undertaken in-house. The workflow will involve the following basic steps:
- Open a new Destructive Sampling Request record
- Record receipt of a signed CBD form
- Record the assessment of the Destructive Sampling Request
- Create a Record Set for all specimens requested
- Add the Destructive Samples to the Destructive Sample Request record
- Add the additional information to the Destructive Sampling Request record
- Record notification that the samples have been received
Step 1: Open
1.1: Open a new Destructive Sampling request record in Specify
As soon as a request is received, this is recorded in Specify by the Registrar who will open a new Destructive Sampling record.
- The number of this record will function as the reference number for this request in the Herbarium.
- Any details of the request that are available at this stage are entered into the Specify record (e.g. names of people involved, description of research aims and methods, etc.).
Click on Interactions and select Destructive Sampling from the menu at the top.
- Select Without Preparations from the pop-up window
- This will ensure that no preparations are added to the Destructive Sampling request at this stage
This will open the Destructive Sampling form with a Destructive Sampling record where you can enter the information about the request.
- At this point in time, you may not have all the information to be entered.
- This record can be saved at any time and completed at a later time. Click Save at the bottom right of the screen.
- The Destructive Sampling Request Number will be automatically allocated when the record is saved. Take a note of this to find the record more quickly later. This number will function as the reference number for this request in the Herbarium.
Status: Select the current status from the dropdown menu (Complete, Denied, No longer required, Pending)
- In most cases at this point in time, the Status would be Pending
- Purpose: Select a value from a dropdown menu. Only select one of the following options. If you need a different value, please ask.
- molecular research (DNA, gene sequencing, etc.)
- anatomical research
- phytochemical research
- general research (when not molecular, anatomical or phytochemical)
- teaching
- illustration
- Description: Enter a short summary of the intended research, and a general taxonomic or geographic summary.
- Loan Num: Enter the associated Loan number if the request originated from a Loan Request or if it triggers a Loan Request.
- Their Num: Enter the other institute’s reference number, if known.
- Legacy Number: This is read only, do not enter data.
- Remarks: Enter any additional information or notes relating to the destructive sampling request. This field may be used as part of the report to be sent to the Requester.
- Denied Samples: Enter the barcodes of any samples that have been denied. If there is another reason for the samples not being approved, then this can information should be included in Remarks above.
-
Internal Misc: This can be used to help with the management process of the request and notes in here do not have to be retained. This would not be included in any report to the Requester.
- Destructive Sampling Agents: Enter the following information if known:
- Herbarium making request: Agent = Herbarium; Role = Herbarium
- Individual researcher named on request: Agent = individual name; Role = Requester
- Supervisor if named on request: Agent = individual name; Role = Supervisor
- Person preparing the samples: Agent = individual name; Role = Preparer
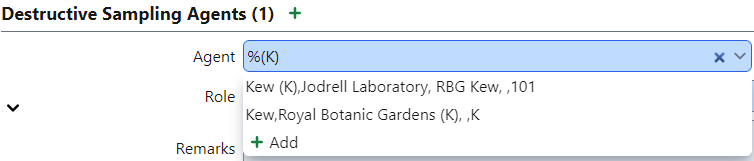
Tip – if you want to search by institution code – you can enter in the agent box: %(CODE) – e.g. see screenshot below:
- Date: The default will be today’s date.
- Remarks: In the Remarks field under the Agent you can add any additional information about the agent/role/status relating to this particular request. Enter any more general remarks about the request to the higher level Request Remarks field.
Click Save
1.2: Record receipt of a signed CBD form
The next step is to ensure that the necessary forms are completed, and that the research aims are clearly understood.
- If clarification is required, there may be an email conversation with the requester.
A signed Destructive Sampling form is required for all requests.
- This includes the CBD form.
- The CBD documentation will need to be in place for any further progress to be made with the request.
- When the signed forms and sufficient details have been received, these are added to the Specify record (e.g. attachments uploaded and descriptions included).
A preliminary, high level assessment is carried out by the Registrar which may flag up any immediate known restrictions based on the request.
- Check through list of requested specimens on CBD form and annotate printout with any ‘red flag’ specimens, based on known restrictions.
- This could include No Third-Party Transfer (N3PT).
Approval in principle will then be requested from the Curator of the Herbarium.
- Pass the annotated printout to relevant member of staff in the next stage.
The request number, internal contact and Herbarium code should be added to any CBD documentation.
- Add the following notes to the completed CBD form:
- Destructive Sampling Request number
- Your name as the RBGE internal contact
Tick the CBD Form checkbox to indicate that the CBD Form has been received.
At this point any documentation can be attached to this record using the Attachment icon. This would normally include the Destructive Sampling form and any correspondence received. 
Click Save
Step 2: Decide
2.1 Locate the specimens to be sampled
The specimens of which samples have been requested are then located in the collection.
- For external requests, the material is located by Herbarium staff.
- For internal requests for Herbarium sheets, these are located by the requester.
- For internal requests for silica-dried material, this is located by Herbarium staff.
If specific specimens have been requested, the following query will facilitate finding the specimens in the Herbarium and will provide some additional information about their availability and restrictions, if known.
2.2 Assess the Destructive Sampling Request
When the specimens have been located and the research aims clarified, the request can be assessed
A range of considerations come into play at this stage:
Justification
- Has the requester provided an outline of the intended research?
- Has the requester provided a case for the need for destructive sampling?
- Has the requester indicated the amount and type of material needed?
- Has the requester provided examples of previous studies or publications proving competence and success with the proposed research techniques
- Has the requester provided details of expected outcomes? (Publications, Images, Taxonomic, GenBank)
- Is the requester a known collaborator and/or affiliated with a research institution?
- Is there reason to believe that the data sought cannot be obtained from a sample (e.g., the technique is not sufficiently well known to consistently produce satisfactory results)?
Legal
- Has the requester provided a signed CBD/MTA form?
- Are there any restrictions on the distribution of the material?
- Taxa included on the CITES lists will have this information in the taxon record.
Availability
- Is there silica-dried material available?
- Are the specimens available?
- Do the specimens have enough material available?
- Will the sampling threaten the preservation of the integrity of the specimen?
- Is alternative material available, e.g. other Herbarium specimens?
- Is the requested taxon amply represented in the collection?
Suitability
- Is the specimen a Type? Type specimens will not normally be approved for general sampling.
- Was the specimen collected prior to 1850? Specimens collected from before 1850 will not normally be approved for general sampling.
- Has the specimen been sampled before? If so, for similar reasons? If so, what was the outcome of the previous sampling, are there any GenBank sequences or publications that could be pointed out to the requester?
- Is the specimen known to be unsuitable for sampling (e.g. old or treated with heat or chemicals which may degrade DNA)?
- Does the quality and quantity of the expected outcomes generate sufficient added knowledge of the specimen?
- Are there any known problems or previous experiences with posting specimens or samples to the requested address?
These points are considered to make a decision about the request, often requiring input from colleagues, for example taxonomic experts and/or the curator.
- It may be appropriate to digitise the specimens to enable the requester to select suitable material.
- If a digitisation request is required, this should be forwarded to the Digitisation Coordinator.
If this is a large request the researcher may be asked to prioritise between 20-30 specimens to be sampled.
- The other specimens can be sampled at a later stage if still required.
- The default for maintaining a Destructive Sampling request record open as pending in this situation would be 12 months
- While communications or information requests are ongoing, the default is to keep the Destructive Sampling request record open as pending for a duration of 6 months.
- If alternative specimens are added/replaced to the request, these will be recorded in the Destructive Sampling request record – they do not need to be added to the CBD form.
If the request is fully or approved in part, then the specimens can be looked out and databased if required.
Record the name of the person who approves or denies the request in the Destructive Sampling record request record in the Agent field. In Agent Remarks enter any additional information relating to the agent in the context of the destructive sampling request, including the date and if the request is approved or denied.
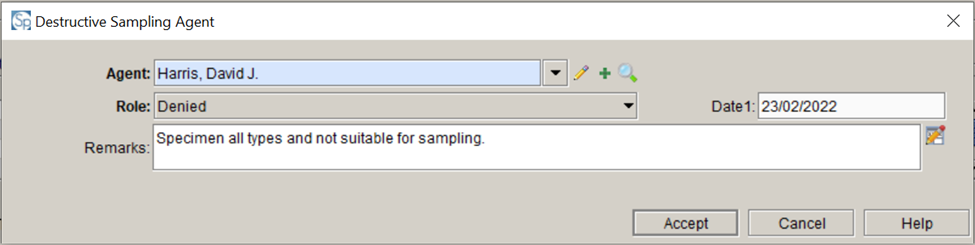
If the whole request has been denied select the Denied status in the Status field. The reason for denying the request can be included here. It should also be included in the Remarks field in a format suitable for sending to the Requester.
- Any specific specimens that have been denied should be recorded in the Denied Samples field, listing the barcode of specimen separated by a comma.
2.3 Inform requester of the outcome
Once a decision has been reached, the requester is informed about the outcome.
2.4 If material cannot be sampled at RBGE, prepare specimens for loan and record sampling upon return of loan
By default, all sampling will be carried out at RBGE. However, in some circumstances, for example if the material is too complex for Herbarium staff to do the sampling, a loan may be arranged and the researcher permitted to sample the specimen themselves.
If a specimen needs to be sent on loan it needs to be partially databased first and then passed on to the Loans Officer. The requester is asked to clearly annotate any sampled specimens. If some specimens included in the loan may not be sampled, this will be explicitly mentioned in the loan paperwork. Upon return of the loan a curator will be notified, the database will be updated, the specimens will be annotated and then laid away.
If a researcher requests to sample specimens they already have on loan, then a note should be added to the Loan Request record that a curator will need to see the specimens on return for annotation.
Step 3: Sample
3.1 If material can be sampled at RBGE, take samples (or facilitate sampling)
If possible, samples are taken by researchers themselves, after a short training.
- If there is more than one specimen on a Herbarium sheet (for example a sheet with multiple cryptogam packets), researchers should temporarily mark up which of the specimens are sampled.
-
Each sample should be allocated a unique identifier. This is constructed using the Destructive Sampling request number followed by a running number for each sample, separated by a colon (eg, 03306:2). The combination must be unique.
- Researchers will then hand the specimens over to Herbarium staff after sampling.
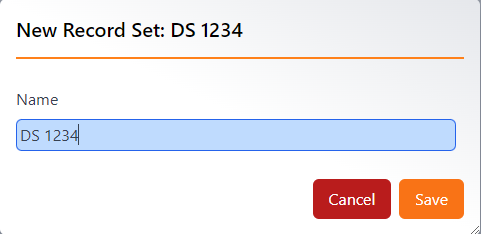
Creating a Record Set for all specimens requested will make the management of the request and recording information easier. The record set lets you easily view the records that have been requested in the destructive sampling request. You can add samples to it, and remove items from it, as the scope of the request is refined. See the section on “How to create a record set” for more guidance.
Note - All specimens will need to be databased prior to creating a record set

Tip - using the Destructive Sampling request number to name the Record Set will help manage multiple Record Sets.
3.2 Annotate sampled specimens
After sampling the specimen sheets or packets are annotated.
- For Herbarium sheets, this is done by stamping the sheet.
- For packets on sheets, this is done by adding an annotation slip to the packet.
Step 4: Record
4.1 Update the database with sampling details
The database will need to be updated with the details of the specimens that have been sampled.
- In Specify, this involves adding destructive samples to the respective collection objects, and then importing these into the destructive sampling record.
For each specimen that has been sampled, create a new Preparation in the Collection Object, by clicking +:

The following information should be entered for a destructive sample Preparation record:
- Prep Type - select Destructive Sample
- Barcode - enter the destructive sample item number. This is constructed using the Destructive Sampling request number followed by a running number for each sample, separated by a colon (eg, 03306:2). The combination must be unique.
- Remarks - enter any remarks specific to the Preparation, not the Collection Object, here. This information can be included in the correspondence with the Requester, e.g., the fact that the specimen sampled was substituted for the one requested.
- Internal Misc – use this field for any internal curatorial information which is not to be shared but be aware that information here could be requested to be seen.
Destructive Sampling section
- Material type - enter the type of material sample (e.g. Flower sample, Leaf sample, Pollen sample).
- Derived from - this is for preparations made for Destructive Sampling ONLY. Enter the barcode of the specimen from which the sample was taken.
-
Denied Requests - this field is available to record the Destructive Sampling Request number for a request for which this specimen was denied. This information should be considered for recording on a case by case basis and is not necessary for every denied request.
Tip - if the request includes specimens that are not to be sampled see the section below on Denied requests/samples.
For more information on entering data into the Preparation record see the Instructions for entering a new Preparation
- Enter any specific Determinations relating to this Preparation if required.
If the remaining information is the same as for the other preparations in the Collection Object record, then click Save and close the record.
You should now see the Preparation for the destructive sample in the list of Preparations in the Collection Object.
It is possible to check the numbering of the samples within the request at any time using the Query tool.
-
Click on Query on the top menu and Select Preparation from the Create Query menu on the left. If it is not visible, click on More Tables to select it.
-
Double click on Barcode, select Starts with as the Operator and enter the Destructive Sampling request number followed by a “:”
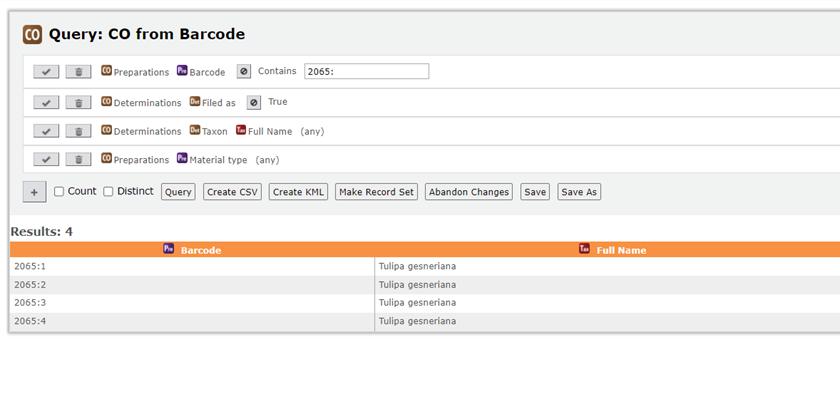
- This will bring up all the Destructive Sample Preparation records that have been created for this request to date, helping to check for duplicates, missing numbers or where you reached with the sampling process.
4.2 Upload relevant correspondence to database record
Electronic copies of relevant paperwork or correspondence can also be uploaded to the destructive sampling record in Specify.
- At the moment, the original paper copies are also kept in the Herbarium Office.
4.3 Add the Destructive Samples to the Destructive Sample Request record
Once all the Destructive Samples have been created, these can be added to the Destructive Sample request record.
This can also be done individually as the sample records are created.
Open the Destructive Sampling Request record.
- Run a query, using the Destructive Sampling Request number, remembering to include any 0s at the start of the number which should be 5 digits, e.g. 03042.
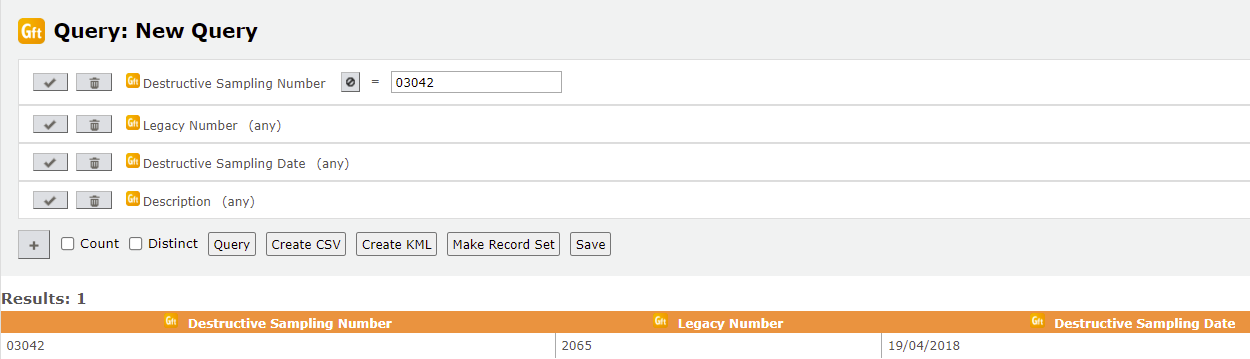
Click on the Result to open the record.
In the Destructive Sampling form, scroll down to the Destructive Sampling Preparations section. Click + to add Preparations.
Select “By Choosing a record set”, then select the record set you created earlier:
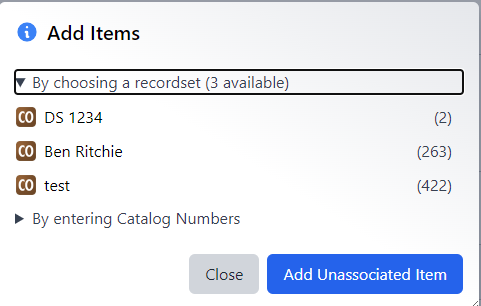
You will now see a list of all samples in the Record Set. This is a list of all preparations of all Collection objects in the list. Select those that are to be used (this will normally be all the Destructive samples), by ticking the tick boxes, and click apply.
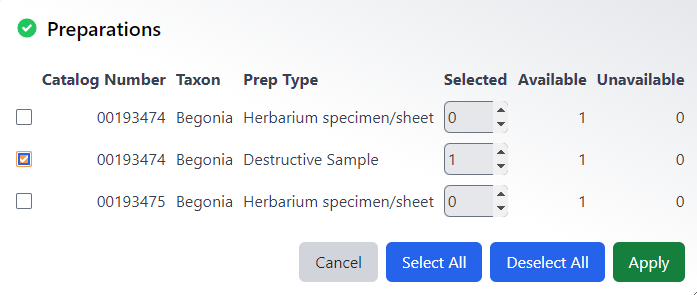
All the sample preparations will now be attached to the Destructive Sampling request record.
Step 5: Transmit
5.1 If appropriate prepare samples for sending and create letter and packing list
This information can be entered at any point once the original record is created.
- Special Conditions: Enter any restrictions relating to the samples being sent. The Permit number could be included here.
- Destructive Sample date: Enter the date the Destructive Sample was sent.
- Generate Invoice on Save: This checkbox can be ticked prior to the final save to produce a packing list for sending the samples.
If samples are to be sent out externally, the samples are clearly marked and securely packed.
An accompanying letter has to be created, as well as an address label and packing list.
The postroom also has to be instructed as to how to send out the samples (using registered post, mentioning specific codes and using specific wording for customs).
Add the tracking reference number to the database record.
Step 6: Close
6.1 Mark the database record as completed
On receiving notification that the samples have been received
Open the Destructive Sampling record and add the following information.
- Date received: Enter the date the samples were received by the requesting institution.
- Received Comments: Enter the response from the receiving institute here.
The destructive sampling record can now be marked up as completed.
6.2 Lay away the specimens
The specimens can be laid away, this is usually done by Herbarium staff.
How to record denied requests/samples
- Specimens denied solely for this request: Record the barcodes of the specimens denied in the Denied specimens field.
- Specimens denied for any request: Record this information in the Internal Misc field of the specimen Preparation record. If a separate field would be useful for this then a request can be raised.
- Specimens denied for any other reason: Consider whether it is appropriate for the information to be recorded against the request or the existing herbarium specimen and use one of the two options above if possible.