The Query Builder
Understanding the query tool interface
- Field Mapper
- Operator
- Negate
- OR search term
- Sorting and Organising tools
- Modifying the query’s results
- Running the query
Query results section
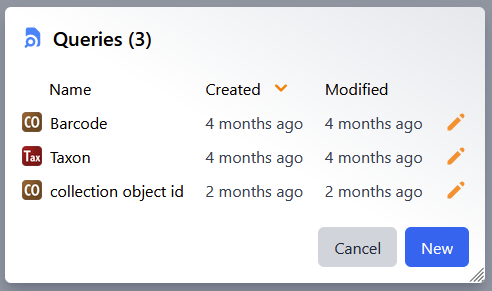
To start using queries click on Queries in the top bar:

This will open a pop up. From here you can open saved queries or create a new one by clicking New:
Understanding the query tool interface
There are two main parts to the query interface, the upper section where you build the query (query builder) and lower section where the results are returned. The software will automatically jump to the results when a query has been completed.
The query builder
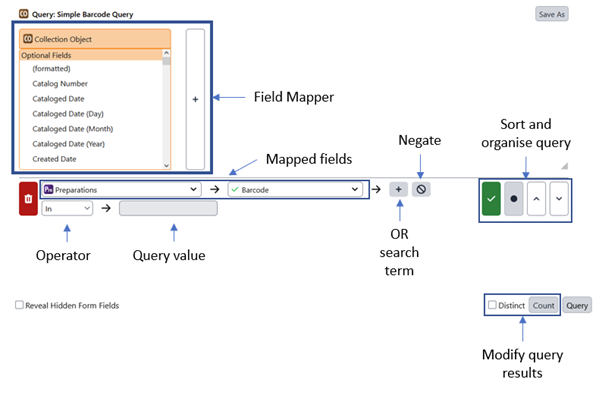
Field Mapper
The base field for this is selected when creating the query. This is the table that the results will be opened in e.g. if you want to see a specimen record (e.g. collector, collector number and collected date) you would want to select Collection Object as the base table. You can select the fields you want to search on and appear in the results by selecting them from the list. As well as selecting fields from the base table you can also navigate to other tables and select fields from there. Other tables have an icon at the front of the name and an > following it:

The output from some tables can be aggregated or formatted to combine information from a particular table. To add a field you can either double click on it or click on the large + button.
Operator
The operator acts on the field to change how the search is carried out. The options in this drop down can vary depending on the type of field that has been selected. The main options are:
| Operator | Explanation |
|---|---|
| Any | Any value from this field is going to result from this query |
| Like | You can insert a wildcard character (*) at the beginning or end of the field to search all items that start or end with an unknown value. Querying *3 will pull all results that end in a 3. |
| Equal | Returns data that are equal to this value |
| Greater than | Returns data that are greater than this value |
| Less | than Returns data that are less than this value |
| Between | You can give it two values and it will pull all data in between |
| In | You can create a non-consecutive list that can be separated with commas or spaces to be searched. Querying 1,3,5,7 will pull the data for your field when it has a value of any of those entered.If you are using the “In” operator on a field that is based on a Pick List, you can hold down “Ctrl” to select multiple items from the presented list rather than typing in a comma-separated list of items. |
| Contains | This finds every instance of a specific string associated with that field |
| Empty | This will only pull data from items that have said field empty |
| True/False | If the value is true or false. |
Negate
The negate or NOT button can be used to say that you want to return results that do not match the query value e.g. you may only want to see records where a field is not empty.
OR search term
You can add an OR search term by clicking on the plus button to the left of a field and add additional search values for this field e.g. below the query would return records where the barcode starts with E005678 or E001234

Sorting and Organising tools
The four buttons to the right of the mapped field allow you to sort and order your query results:
The tick button allows you to hide a specific field from the query results, whilst still including it in the query itself. By default all fields are unhidden  , click the button once to make the field hidden
  .
.
The next button sorts the results, default is no sort  , click once to sort ascending
  and again to sort descending
  . The last two buttons allow you to reorder the fields in your query, this affects how they appear in the results

Modifying the query’s results
Distinct  this will return a list of one off items (e.g. Localities) from a concise query, without duplicates.
Count  returns the count of result of the query without displaying the results themselves.
Running the query
To run the query, click the  button. The page will jump down and may take a few minutes to load, depending on the nature of the query.
Query results section
The main body of this section will be the results from your query, they will be displayed based on the sort settings you may have applied in the query builder.
Saving and Editing Queries
At the top of this view are three buttons:
 returns you to the query builder where you can modify the query
 Saves the current query
 allows you to save changes to a previously saved query, whilst keeping the original.
Viewing Query results
There are several ways in which the results of the query can be worked with.
Above the results are four buttons that enable you to work with all or a subset of the results:
 creates a comma separated file of the selected results
 creates a Google Earth file from a query that includes geographic data
 allows you to save the selected results to a record set to be referenced later. A record set can also be used for reports and labels
 opens up an interface, similar to a record set, to browse the query results.
Individual records can be selected for inclusion in the options above by selecting the records using the check box to the left of the individual results

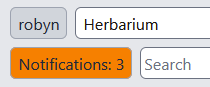
The CSV and KML files can be downloaded from the notifications button in the top right of the interface.
Individual results can also be viewed by clicking on the  symbol to the left of the result, this will open the record in a new tab in the web browser.